How to Test a Solenoid Safely Today
Testing a solenoid requires care and the correct tools, especially when learning how to test a solenoid. Using incorrect methods or tools can lead to damage or injuries. Machines with moving parts often experience more breakdowns as they age. For solenoids, not using them for over 275 hours can lead to sticking, which highlights the importance of regular testing. Experts recommend testing weekly at first, then adjusting based on the results. By following the right steps on how to test a solenoid safely, you can ensure it operates effectively and avoid costly issues.
Key Takeaways
Use proper tools like multimeters and test lights to check solenoids.
Test solenoids often, at least once a week, to avoid problems.
Follow safety rules, like wearing gloves and using safe tools.
Measure resistance and continuity to check if the solenoid works well.
Keep solenoids in a dry spot to stop rust or damage.
Look at and clean solenoids regularly to keep them working longer.
Change broken or old solenoids quickly to stop equipment issues.
Have extra solenoids ready to replace broken ones fast and save time.
Tools for Testing a Solenoid
Testing a solenoid needs special tools for accurate results. Each tool has a specific job to help find problems. Below are the main tools you’ll need for testing.
Multimeter
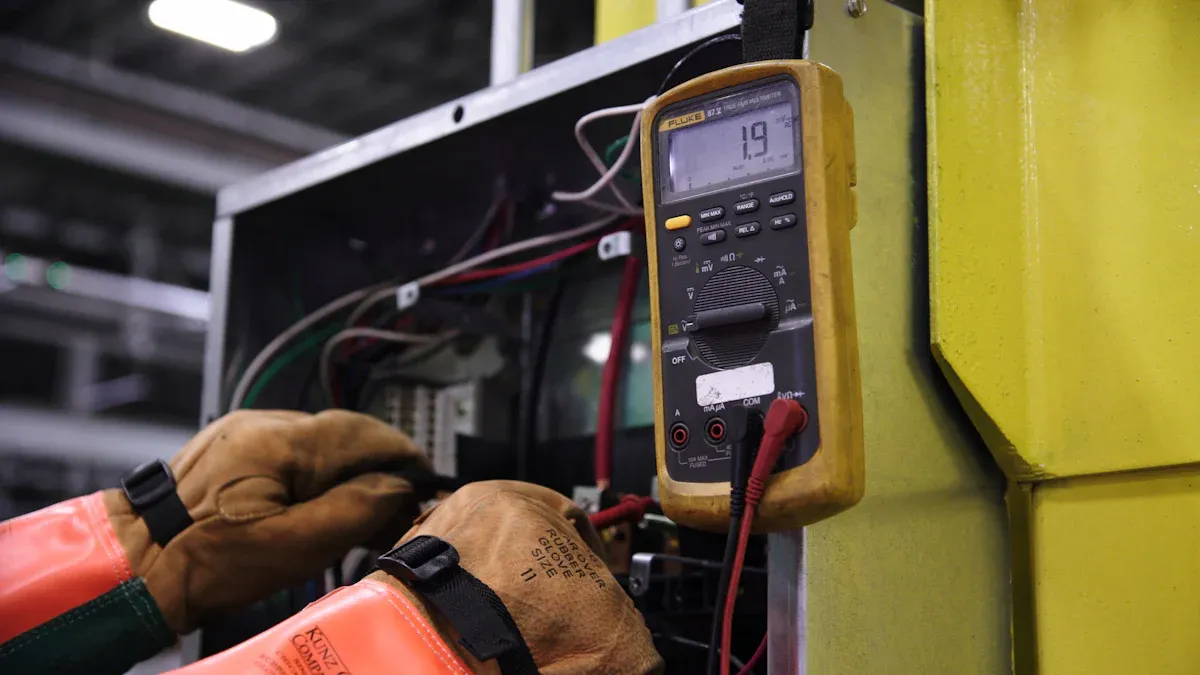
A multimeter is a handy tool for testing a solenoid. It checks things like voltage, resistance, and continuity. These are important for seeing how the solenoid works. For example, the Fluke 88 multimeter can measure signals like a 24.9% command to a purge solenoid. This helps confirm the solenoid and circuit are working properly.
You can adjust the multimeter for negative or positive slope settings. This depends on the solenoid's control type. Always make sure your multimeter is safe and calibrated. Look for certifications like UL or CE Marking to ensure it meets safety rules.
Certification Type | What It Means |
|---|---|
UL Certification | Safe for use in North America. |
CE Marking/ATEX | Safe for explosive areas in the EU. |
CSA Certification | Meets Canadian safety rules for risky uses. |
IECEx Certification | Global safety for explosive environments. |
NEMA Rating | Protects electrical parts from the environment. |
IP Ratings | Guards against dust and water. |
Test Light
A test light is another simple tool for solenoid testing. It checks if power and ground connections are working. Connect the test light to the solenoid's terminals. If the light turns on, the circuit has power. If it doesn’t, there might be a wiring or solenoid problem.
Test lights are great for spotting weak connections. They are also cheap and easy to use. Just make sure the test light matches the system’s voltage to avoid damage.
Power Probe
A power probe is perfect for detailed solenoid testing. It lets you send power directly to the solenoid to see if it works. For example, the Bartol Mag-Probe can find small magnetic fields in a solenoid even when it’s off. This helps spot problems like leftover magnetism that could cause issues.
Power probes work fast and are very accurate. In places like aircraft maintenance, they can find solenoid problems in seconds. A new solenoid tested with a power probe showed no leftover magnetism, proving it was reliable. This makes the power probe a must-have tool for testing.
Tip: Always follow the instructions from the maker to avoid damage.
Additional Tools for Solenoid Testing
Using the right tools makes solenoid testing safer and more accurate. While tools like multimeters, test lights, and power probes are important, extra tools can make testing even better. These tools solve specific problems and give more precise results.
Electronic Solenoid Testers: New electronic testers are better than older ones. They detect small voltage changes to find hidden problems. They also have safety features like fuses and meet CAT safety rules. This makes them safer and more reliable for solenoid testing.
EMI Suppression Solenoid Valves: Electromagnetic interference (EMI) can cause solenoids to fail. EMI suppression valves reduce this interference, helping solenoids work properly. Using these valves during testing ensures smoother and more reliable results.
Clamp Meters: Clamp meters measure current without cutting wires. This is helpful for testing solenoids in live circuits. They let you check current flow safely and find problems like too much current or unusual behavior.
Insulation Testers: Insulation testers check if solenoid wires are in good shape. Bad insulation can cause short circuits or poor performance. This tool helps you find wiring problems and avoid dangers.
Note: Always pick tools that follow safety rules and match your solenoid system. This keeps testing safe and accurate.
These extra tools help you find and fix solenoid problems better. Adding them to your tools keeps solenoids working well and safely.
How to Test a Solenoid
Getting Ready for the Test
Before testing a solenoid, get everything ready for safety. Gather tools like a multimeter, test light, and power probe. Check that these tools work well and are calibrated. Look at the solenoid for damage, like cracks or rust, which can affect how it works.
Steps to prepare for testing:
Unplug the solenoid from power to stay safe.
Pick a solenoid that fits the test needs.
Get extra tools, like temperature testers, if required.
Make sure the battery is charged and working.
Set up in a bright, quiet workspace.
Tip: Wear gloves and safety glasses when working with electrical parts. This keeps you safe from injuries during testing.
Good preparation makes testing safer and gives better results.
Measuring Resistance
Checking resistance shows if the solenoid's coil works right. This test is simple and doesn’t need taking the solenoid apart. Use a multimeter to measure resistance accurately.
Steps to test resistance:
Turn the multimeter to resistance (Ω) mode.
Touch the multimeter probes to the solenoid's terminals.
Read the resistance value on the screen.
A working solenoid has resistance within the maker’s range. If the number is too high or low, the coil might be broken or shorted.
Note: Wrong resistance readings can confuse results. Always check the maker’s guide for correct values.
Testing Continuity
Continuity checks if electricity flows through the solenoid. This test finds breaks or wiring issues. It’s important to know if the solenoid will work under normal use.
Steps for continuity testing:
Switch the multimeter to continuity mode.
Place one probe on each solenoid terminal.
Listen for a beep or check the screen.
If it beeps or shows low resistance, the circuit works. No beep or infinite resistance means the circuit is broken, and the solenoid might need replacing.
Tip: Continuity tests help find problems before using solenoids in important machines like starters.
By following these steps, you can test a solenoid's resistance and continuity. This ensures it works safely and properly.
Testing Voltage
Checking voltage ensures the solenoid gets the right power. This step is key to finding power problems. If a solenoid doesn’t get enough voltage, it won’t work. This can cause issues in systems like starters or valves.
Follow these steps to test voltage:
Switch your multimeter to voltage mode.
Attach the probes to the solenoid's terminals.
Turn on the power source and check the multimeter reading.
Compare the reading to the maker’s guide. If the voltage is too low or wrong, the solenoid might have a bad coil. There could also be a problem with the power source. For example, a starter solenoid with low voltage won’t start the motor, leaving the vehicle stuck.
Tip: Make sure the battery is fully charged before testing. A weak battery can give wrong readings and make fixing harder.
Voltage testing is simple and shows if the solenoid gets enough power. It also helps you find out if the problem is with the solenoid or the power source.
Activating the Solenoid
Turning on the solenoid is the last test to check if it works. This step shows if the solenoid does its job when powered. For example, a starter solenoid should start the motor when turned on.
Steps to activate the solenoid:
Connect the solenoid to a power source like a battery.
Use a power probe or jumper cables to apply voltage.
Watch how the solenoid reacts.
A working solenoid will click or move parts inside. If it doesn’t, the coil might be broken, or it could be stuck from dirt or wear. You can also test how the solenoid works under load. For example, check if a starter solenoid turns the engine when powered.
Note: Always follow the maker’s instructions for activation tests. Using the wrong voltage can harm the solenoid or other parts.
Activation tests are a good way to check if the solenoid works. They confirm it powers on and off as needed, proving it’s ready for real use.
How to Test a Starter Solenoid
Finding the Starter Solenoid
Before testing, you must locate the starter solenoid. This part sends power from the battery to the starter motor. Knowing its location helps you test the correct part and avoid mistakes.
To find the starter solenoid, look for these clues:
It’s usually near or attached to the starter motor.
It has two big terminals: one links to the battery, the other to the starter motor.
A smaller terminal connects to the ignition switch to activate it.
Replacing bad solenoids keeps the system working well. New designs make solenoids stronger and easier to spot.
Effect on Solenoid Performance | |
|---|---|
Shape | Helps it work properly |
Material | Changes how it performs |
Air Gap | Important for pulling force |
Limits | Sets how far it can work |
Current Conditions | Changes how it reacts |
Weight | Affects plunger movement |
Damping | Controls plunger motion |
Taper Angle | Changes pulling force |
Plunger Length | Affects speed of response |
Magnetism | Changes overall performance |
Spring Strength | Controls plunger bounce |
Knowing these features helps you check the starter solenoid and see if it’s in good shape.
Testing the Starter Solenoid with a Multimeter
A multimeter is great for checking a starter solenoid. It measures voltage and checks if electricity flows correctly.
Steps to test with a multimeter:
Set the multimeter to voltage mode.
Put the positive probe on the terminal linked to the battery.
Place the negative probe on the ground terminal.
Turn the key to "start" and check the reading.
A good solenoid shows the same voltage as the battery. If the reading is low or missing, the solenoid might be broken. Switch the multimeter to continuity mode to check the circuit. No continuity means the circuit is damaged.
Using Jumper Cables for Starter Solenoid Testing
Jumper cables are a fast way to test a starter solenoid. They show if the solenoid sends power to the starter motor.
Steps to test with jumper cables:
Attach one end of a jumper cable to the solenoid's Blue/White wire. Connect the other end to the battery’s negative terminal. If the solenoid clicks and the starter works, it’s fine.
To test the starter button, connect a jumper wire from the Red/White wire to the battery’s positive terminal. Then, link another jumper wire from the Blue/White wire to the matching wire on the vehicle.
If the solenoid doesn’t click or the starter doesn’t work, it may need replacing. This method is simple and helps find problems quickly.
Tip: Make sure the battery is fully charged before testing. A weak battery can give wrong results and waste time.
By following these steps, you can check a starter solenoid and fix any problems.
Safety Precautions for Solenoid Testing

General Safety Guidelines
Testing a solenoid needs careful attention to safety rules. These rules protect you and your tools. Learn about industry standards to handle solenoids safely, especially in risky areas. Certifications like NFPA and IEC prove the solenoid meets safety laws.
To stay safe during testing:
Check equipment often to find hidden problems.
Make sure solenoid valves are certified and reliable.
Use tools that match safety ratings for the circuits.
Even safe-looking tools can have hidden dangers. For example, a worker got shocked while testing a motor controller because of bad equipment. This shows why using good tools and following safety steps is important.
Tip: Wear gloves and safety glasses when working with electrical parts.
Handling Electrical Components Safely
Taking care of electrical parts helps your solenoid last longer. Clean off dust, check wires, and fix problems quickly. This keeps the solenoid working well.
Follow these tips:
Test your tools on a known power source before and after use.
Replace test leads every year to keep them safe.
Don’t wrap test leads around tools to avoid damage.
Test circuits for no voltage before working on them.
Use live-dead-live tests to check your meter works properly.
Use multimeters rated for the circuits you’re testing. Newer models are safer and more accurate. Using them right reduces mistakes and keeps you safe.
Note: Always check your battery before testing. A weak battery can give wrong results and waste time.
Preventing Equipment Damage
Protecting your solenoid and tools takes planning and care. Separate control systems, like hydraulic ones, lower risks during testing. Extra solenoids can prevent failures but may need more power.
Good practices include:
Testing slide valves while running to stay safe.
Knowing gas-tight shutoff challenges that affect system safety.
Using multiple solenoids for reliability while managing power limits.
When testing a starter solenoid, make sure the battery is fully charged. This avoids extra strain on your tools. Preparing well and following safety rules protects your equipment and gives better results.
Tip: Follow the maker’s instructions to avoid damaging the solenoid or other parts.
Troubleshooting Common Solenoid Issues
Solenoid Not Activating
If a solenoid doesn’t activate, it may have electrical or mechanical problems. First, check the power source. A weak or dead battery might stop the solenoid from getting enough voltage. Use a multimeter to test the voltage at the solenoid’s terminals. If the voltage is too low, the battery may need charging or replacing.
Other issues include burned coils, stuck contacts, or blockages. Coils can burn out if the solenoid gets too much current because the plunger doesn’t close. Stuck contacts happen when the solenoid faces too much force or high voltage. Dirt or debris can also block the solenoid’s movement. Look for damage or dirt and clean the solenoid if needed.
Tip: Check the voltage regularly to keep it steady and avoid failures.
Weak or Intermittent Activation
A solenoid that works weakly or sometimes may have worn parts or bad connections. Start by checking the wires and connections. Loose or rusty wires can stop electricity from flowing properly. Tighten loose wires and clean rust to fix the problem.
Broken coils or weak parts inside can also lower the solenoid’s strength. For example, a bad starter solenoid might not fully engage the motor, making the engine crank slowly or not at all. Use a multimeter to test the solenoid’s resistance. If the resistance is wrong, the coil might need replacing.
Overheating can also cause the solenoid to work off and on. Hot surroundings or poor cooling can damage the coil. Watch how often the solenoid cycles to avoid overheating. If you smell burning or see discoloration, replace the solenoid.
Note: Too much holding current from high voltage can cause overheating. Always check the voltage to avoid damage.
Solenoid Stuck in Position
A solenoid that won’t move might be stuck from not being used or from wear. If it stays still for too long, parts like O-rings can stick due to friction. This is called stiction. Engineers suggest using solenoids weekly to avoid this.
Check the solenoid for wear or damage. A stuck solenoid might also leak fluid if seals are broken. Look for leaks and replace seals if needed. For starter solenoids, make sure the plunger moves freely and isn’t blocked by dirt.
If the solenoid still won’t move, you might need to use extra force to free it. But this should only be temporary. Using a stuck solenoid for too long can cause damage and make it fail.
Tip: Test solenoids regularly to keep them working and avoid stiction.
Overheating Solenoid
Overheating can harm a solenoid and shorten its life. When it overheats, the solenoid might stop working or damage other parts, like the starter. Knowing what causes overheating helps you avoid this issue and keep things running well.
Many things can make a solenoid overheat. Dust and dirt, called particle buildup, can block the plunger. This adds friction and wear, forcing the solenoid to work harder. Corrosion is another problem. Chemicals can harm parts, making moving pieces not work smoothly. If the coil gets damaged, the solenoid may overheat while working.
Power problems also cause overheating. Wrong voltage can stop the solenoid from working right. For instance, if it runs too often without cooling, it overheats. This can burn the coil. Hot surroundings or not enough cooling time after use can also burn the coil.
Cause | Problem |
|---|---|
Particle Buildup | Dust and dirt block the plunger, causing extra wear. |
Corrosion | Chemicals harm parts, affecting movement and damaging the coil. |
Power Problems | Wrong voltage or overuse overheats the solenoid, especially if cooling time is skipped. |
Burnt Coil | High heat or no cooling time burns the coil, leading to failure. |
To fix overheating, check the solenoid for damage. Look for dirt, rust, or burnt spots on the coil. Clean it often to remove dust. Replace corroded parts to make it work properly again. Always check the voltage with a multimeter to ensure it matches the maker’s guide.
When testing a starter solenoid, check the battery. A weak battery can send uneven power, causing overheating. Charge the battery fully before testing. If overheating continues, replace the solenoid. Using a bad solenoid can harm other parts, like the starter motor, and lead to expensive repairs.
Tip: Regular care stops overheating. Clean the solenoid, check the battery, and test weekly to find problems early.
By knowing what causes overheating and taking steps to prevent it, you can make your solenoid last longer and avoid downtime.
Tips for Maintaining Solenoids
Regular Inspection and Cleaning
To keep your solenoid working well, inspect and clean it often. Dust and dirt can build up and cause problems. Look for rust, cracks, or other damage on the solenoid. These issues can make it stop working.
Use a soft cloth or brush to clean the surface. For tough dirt, try a mild cleaner. Don’t use strong chemicals that could harm the parts. If you’re cleaning a starter solenoid, check the terminals carefully. Rusty terminals can block electricity and stop the starter from working.
Tip: Check your solenoid every week if you use it a lot. This helps you find and fix problems early.
Proper Storage Practices
Storing your solenoid the right way keeps it safe when not in use. Put it in a clean, dry spot to avoid rust or damage from moisture. Humidity can harm the coil and other parts inside.
If storing a starter solenoid, disconnect it from the battery first. Leaving it connected can drain the battery and harm the solenoid. Cover it to protect it from dust and bumps.
Note: Label stored solenoids clearly. This makes it easy to find the right one later and saves time.
Scheduled Testing and Replacement
Testing your solenoid regularly ensures it works properly. Use a multimeter to check resistance and continuity. For a starter solenoid, test the voltage too. Low voltage might mean a weak battery or bad solenoid.
Replace the solenoid if it’s worn out or fails a test. A broken solenoid can stop your equipment or vehicle from working. Test it every month or after 100 hours of use.
Tip: Keep an extra starter solenoid ready. This helps avoid delays if one fails unexpectedly.
To test a solenoid well, you need the right tools. Tools like multimeters and power probes are very helpful. Use proper methods, such as checking resistance and voltage. Always follow safety rules, like wearing gloves and using certified tools. This keeps you safe and helps the solenoid last longer.
Solenoid testing is important in many industries. For example, car makers use solenoids a lot. Testing them ensures they work properly. The table below shows key facts about solenoid testing:
Key Fact | Explanation |
|---|---|
Main Industry | Car making leads because solenoids are used often. |
Growing Areas | North America and Asia-Pacific are growing in solenoid testing. |
Important Reasons | More cars and strict safety rules increase testing needs. |
Top Testing Method | Performance tests are key to check solenoid efficiency. |
Investment Focus | Better tools and faster testing are needed for big production. |
Future Changes | New car technology will need special testing solutions. |
By following these steps and testing often, solenoids will work well. Regular checks, cleaning, and testing prevent problems and save money. Keep your solenoids in good shape to avoid breakdowns.
FAQ
What is the best tool for testing a solenoid?
A multimeter is the best tool to use. It checks voltage, resistance, and continuity. This helps you see if the solenoid works well. Make sure the multimeter is safe and calibrated.
How often should you test a solenoid?
Start by testing it every week, especially for older solenoids. Change how often you test based on the results. Regular checks stop problems like sticking or overheating.
Can you test a solenoid without removing it?
Yes, you can test it without taking it apart. Use tools like a multimeter or test light. These tools check voltage, resistance, and continuity while the solenoid stays in place.
What causes a solenoid to overheat?
Overheating happens from wrong voltage, dirt, or overuse. Check for burnt coils or stuck parts. Clean the solenoid and make sure it gets the right voltage.
How do you know if a solenoid is stuck?
A stuck solenoid won’t move or turn on. Look for dirt, rust, or broken seals. Test it weekly to stop it from sticking. Clean and oil parts to keep them working.
Is it safe to use jumper cables for testing?
Yes, jumper cables are safe if used the right way. Attach them to the solenoid and battery. Make sure the battery is fully charged to get correct results.
What should you do if a solenoid doesn’t activate?
Check the power source first. Use a multimeter to test the voltage at the terminals. Clean off dirt or replace broken coils. Regular care stops activation problems.
How can you extend the life of a solenoid?
Check and clean it often. Store it in a dry place. Test it every month to find problems early. Replace worn parts to keep it working longer.
Tip: Keep extra solenoids ready for quick fixes.
See Also
Testing Starters for Vehicles and Equipment: A Guide
Easy Steps to Effectively Test a Zener Diode
Mastering Multimeter Use for HVAC Capacitor Testing
